Blog

Entering the 2021 World bodyPaint Festival in Covid times

I’ve been lucky to be sponsored to go to the World Body Painting Festival (Body Art’s World Championships) twice. I’d go every year but flights, accommodation & food in Austria in peak summer season make it hideously expensive. And means I miss earning at bookings. Plus now it’s on before school stops for summer.

(2007 I assisted Bibi Freeman – 1 of my fave painters/ people & the inventor of the 1st rainbow one-stroke facepaints – when she Da Vinci brushes kindly invited me. We made it through day 1 and were ?12th? in the finals! She also won the World Face Paint Award and I was delighted to be 5th, as I’d only been face painting a couple of years.)

(2015 I had Paintopia Jenn as my assistant and painted Laurence Caird in the Brush & Sponge category, with paint sponsored by the fab Eugenie of Cameleon body paint. After 2 hours painting she had to be hands-off, trying to supply me with things I lost the words for. We made it through to the finals with our 1st paint, and finished top 20 with our 2nd, again I’ve lost memory of where, 19th?)

I’ve been wanting to go again, but 2020 it didn’t happen and I was too caught up – attempting to home-educate my kids whilst shielding- to even look at the online event they held.

In 2021, just as restrictions lifted and I began painting at selected Covid-tested events, I was told they were running an Online Covid WBPF. I was asked to help Bath become the UK WBPF ‘Hotspot’ and paint there with as many others as we could. In 2 weeks. I was fully booked with Hobbycraft & wedding paints except for 1.5 days off before that date. But it was my only free Saturday in months, and Izabela K was available too.

I’d not painted anyone except faces on my youngest son in 18 months due to Covid, and people generally plan, build props and practice for months before entering the WBPF.

Then Hamish of Gibralter Body Art kindly offered to sponsor both our entrance fees and a loo at the Field Good Bar which took most of the money pressure off. So I said yes; Iz & I would meet up to celebrate being able to paint again if nothing else.

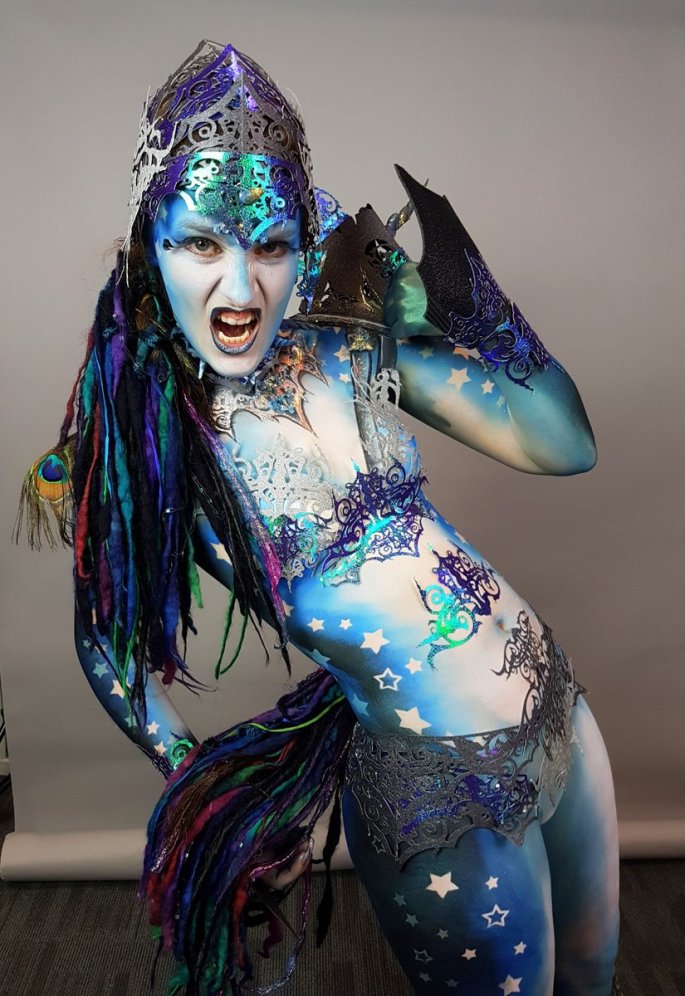
I drove my colleagues mad trying to work out a design; the given theme was ‘Historic Moments’ and I decided COVID was DEFINITELY in that category, but how to paint it? Then I realised, it isn’t the 1st international plague, let’s do them all. World diseases and their vectors/ causes/ effects on Izabela’s front, cures real or imagined on the back. I used my Cricut to cut Covid virus stencils in assorted sizes from the reusable mylar I use for the stencils I sell, and then matching virus shapes from hot pink, teal, navy and white for a head-dress. I added Cricut-made card syringes on the back of the virus, along with a hand sewn plague mask. In hot pink foam of course.

Just after starting

On the day I had my fave Cameleon colours (thank you Paintopia Jen for sponsoring those and the Paintopia Pants) and the new Cameleon long-handled kabukis to try.

I used the Nippies modesty covers I bought at Magic Box recently rather than my fave single use but expensive (and hard to get, as creator John nearly died from Covid and had been in hospital for months) Monster Pasties. I am impressed with the Nippies, they are the first silicone boob covers I like, possibly as they have a matt finish. They are reusable, in a decent reusable box and incredibly easy to put on. We’ll see how many paints they last on Izabela.

I told Iz I had a nearly set idea for her front, and aside her bottom at the back being yellow, no back plan. We agreed that as we wanted to enjoy it, both had work early the next day (she was off to Cardiff at 5 a.m.) & I had to get all the photos/ paperwork in by midnight, that we would finish early. There was an option to paint for 8 hours instead of the usual 6, but we stopped at 6! Rules meant we had to take a photo at the beginning, every hour and at the end to show our progress & times taken.

Sooo the front of the design; white Grimas base, all other paints Cameleon from Paintopia – Bollywood Pink, Inkheart Blue, Teal, Line white and neons. The stained lip shows where virus/ bacteria entered lungs for Spanish Influenza/ COVID, and spread throughout the body (virii using my stencils). The fleas represent Bubonic Plague getting into the bloodstream after flea bites,veins morphing into the dark dead fingers often seen in Black Death. The dots of the virus merge into the skull eye sockets for all the people who lost their lives but also are the ‘buboe’ lumps on the skin.

The back was a bit of a doodle really. Fresh air and UV rays which helped many pandemic treatments – during the Spanish Flu epidemic they created open air hospital tent cities. Also syringes of inoculations in the sun beams, and several plants/ herbs/ flowers that were thought important – onions by Bubonic Plague doctors, more recently in SARS the Chinese government said Woad helped.

So, Iz & I finished after 6 hours and I was really happy I could still use a paintbrush. She posed brilliantly as ever. Tony Cooney took the official pics to send off to the judges that night, and Iz did some fab shots with her friend Chris Daw.

Then Mik Garton got some blinders on his Iphone in the sun – what amazing weather, it had rained for weeks! I think it was about 8 p.m. by then.

Izabela-model shot by Chris Daw art BodyPaintingByCat

So I packed up and cleaned whilst Izabela posed. The nippies came off easily but worked well! And Iz, for once too warm most of the day, had her cold cider at the end.

The results were announced a week later. I was painting at another outdoor wedding and could feel my phone buzzing as I worked. It wasn’t until I finished late that night I saw that people thought I’d been in the top 20, as my photo of Iz had been on the live WBPF TV show!

Izabela-model shot by Mik Garton, Art BodyPaintingByCat

I was delighted & amazed to find I had placed 14th, highest of the UK entries, against around 100 really amazing competitors.

Izabela-model shot by Mik Garton, Art BodyPaintingByCat

Huge thanks to Clemency Bedford & all for organising the hotspot/ photography/ venue, Field Good Bar for the amazing pizzas, all the photographers, Hamish for sponsoring fees, Paintopia for paint & Izabela for doing this with me.

Izabela-model shot by Mik Garton, Art by BodyPaintingByCat

I’m almost inspired to actually go to WBPF in Austria in 2022 if it’s all on again!

What to do when you can’t bodypaint during a pandemic, #1.

Soooo…. what a year! I still subscribed to a lot of the Chinese newspapers from living and painting in Hong Kong, so had been alarmed by virus reports, and stopped taking bookings over Dec 2019. Which meant that aside for 2 bookings in January, I didn’t paint any bodies at all in 2020.

Luckily, I had a 4 year old, who (to begin with) was very keen on face painting. His elder brother hates it, and has been painted maybe 5 times in his whole life, including, once, by someone at Centre Parcs who’s ‘creation’ confused even my incredibly polite mum.

Usually, with school runs/ kids, house, working for Hobbycraft and my own face/ body paint bookings and craft orders, I had to fight Euan off my facepaint kit and restrict him to faces at weekends. He does have his own mini kit, but of course my big expensive setup is far more interesting to him.

Luckily, his infant school set fairly vague themes every week of that first lockdown. As long as we did things (suggested, or our own ideas) to vaguely go with the book or theme of the week, and sent in photo evidence, we were OK. So we did crafts, attempted to read books (nope – he loves being read TO, just not DIY-ing it). And, face painting.

As I began my facepaint career when I was a Zoo Education Officer, I have always talked about the creature I was painting to the face getting painted, as an extra learning opportunity.

Euan and I would watch some research – usually a marvellous BBC Wildlife episode, or the bits chopped out by Andy on CBBC, followed up with facts from the amazing Arkive site which was contributed to by my old workplace the Natural History Museum and many of my University Biological Imaging colleagues. Then I would paint whilst chatting to him, and later film him explaining his facts, to send to school.

Some of the parents in his class asked to watch, so we started filming or even live-facebooking these face painting chats. This was a bit of a learning experience for me as Paintopia Jenn usually deals with all the techy / social media bits and I just talk or paint on them! I’ve a setup to film myself body painting in time-lapse, but it didn’t really work for live faces/ chatting, as I couldn’t always see if we were properly in the screen.

So here you go.

Squiggly random 4 year old…

1st week – Super hero Week & Bat Appreciation Day

A rainbow bat. (Yes I had yet to order our first shaver to do his haircuts). I was still trying to set up my phone whilst accidentally filming so please excuse the flapping around at the start.

Still Super Hero Week – so, Spidey. This was the 2nd attempt that morning, as tears had destroyed the first.

The live for this Batman-city is on my facebook…

Same for this Teenage Mustant Ninja Turtle

The Enormous Crocodile Book week – interactive talking crocodile facepaint

And look – 1st every haircut by mummy! Poor soul, they do improve, I hope…

Another reptile, a lizard

Hmm, a lizard…cant find the video think it was a Facebook live only…

Still on Roald Dahl, so, a snake arm paint…

A favourite, DINOSAUR week. He didn’t want my standard easy talking dino, but a stegosaurus, which I need to think more on.

And more, my 1st go at a Pteranodon flying dinosaur, needs another go… I wasn’t allowed to finish either.

This week – Sealife! So we made a Shark fin/ teeth headband , and this…

Africa was this week’s lockdown homeschooling project, so I had LOADS of ideas as 1 of the Zoos I worked in is now called Africa Alive so even back in 2000 specialised in African species. Ahhh, doing the lion talks whilst trying to avoid reg the male spraying us with urine through the fence…

Anyway, grumpiest Equine things I have met, a Zebra.

And then a tiger, of course. Memorable events at ‘my’ zoos included one tiger charging straight at me (still 1 fence between us) then clapping his gigantic paws together and showering me with a puff of feathers and blood, as he caught a very confused pheasant in front of a large audience.

This cheetah facepaint suited him…

Hopefully that killed off an hour of lockdown for you, we (mostly) had fun doing them!

All products are cosmetics, mainly Csmeleon paints & brushes from the Paintopia store. Most stencils I make and sell myself on Cats Craft Cabin , or contact me.

Revamping my Face Paint Kitbox Part 2 – recovering my CraftnGo with new vinyl.

As stated in the previous blog “Revamping-my-face-paint-kit-again-craft-n-go-part-1”, I’ve tried many variations of how to carry and use/ display my kit over the last 20 years.

Since 2016 I have stayed with theCraftNGo. I work, teach, demo and judge at events all over the EU and further, in public & in the face & body art and beauty industry, as well as at festivals, so have seen many variations of kit boxes over the years and think this is the best& toughest available just now for free-lance face-painters.

Makeup artists who face paint face different environments mostly so don’t bite my head off, I’ve just seen too many of the fancy makeup rolling stations suffer on rough ground and outside bookings to want one. And tough/ portable as the lovely Zuca bags are, at that price I don’t want to waste time pulling out lots of wee bags of paint to still then need a table and to have to set it all out.

I originally covered the inner grey metal base plates with sticky back black vinyl, which I have done with many kits, etc, as it looks smarter and stains less. I do a lot of clubs, adult events and corporate gigs, and they usually ask for a plain black setup.

However as the inner lid had had mirrors etc magnetized onto it, I had never covered it in vinyl, and after several years of constant use, it had stains that wouldn’t come off. The vinyl was a bit nicked and stained too, so I peeled it all off easily and got ready to start again.

I have loads of ‘nice’ craft vinyls I use in my Cricut for art projects and other bookings – my current fave is this stunning holographic pearl in all its shades which I often sell as a laptop decal (not this design, this was my test with  a non-original pattern). But I know how easily that scratches and  wanted tougher, cheaper, larger sheets for this.

I’ve still a large roll of the black gloss vinyl but fancied a change, so searched on ebay. LOADS of options! I went for a 3 for 2 offer on glitter gloss vinyl, 610 mm x1 meters each, which worked out at £10 a roll including some new squeegees. It is cheaper if you buy a big bulk roll as I did for the black gloss (still loads left and its done about 4 kits plus assorted signs) but I wanted to see these in real life first. You can get cheaper but I wanted it fast as I have bookings I need to use my kit at.

I went for black, silver and green holographic glitter, incase I went green as I mainly work for Paintopia when not on my own bookings and thats the Paintopia green.

I decided I liked the black for the base plates which see the most use, and  the silver best in the lid as it would reflect light onto the paint, helpful in darker bookings even when I have my lights etc.

If you ever had to cover school books in clear sticky back plastic (aka Fablon) this is the same idea.

Sorry for the wibbly videos & lack of proper time-lapse, our builder stacked giant mirror sliding doors in front of my cupboard so I can’t get my tripod out atm.

And now for that a wee bit slower!

1 – Draw around each bit you want covered, leaving a 1 inch at least wider border when you cut it out. The back of the carrier sheet is usually gridded papery stuff so easy to cut out/ draw on.

2 – Make sure your metal plate is clean. You can either do this dry if you are used to it/ its an easy flat shape, or drip or spray a little water or weak soapy water onto the metal. This means you can slide the vinyl around a bit so it is easier.

3 – If you have it, put a spare non-stick surface under the  metal sheet so the overhanging edges of what you are adding won’t stick to your table.  (Makes it all more awkward). Place your cut bit vinyl side up over the metal plate, making sure it is centred.

4 – Starting at 1 corner or edge, peel a little of the backing off the vinyl to stick it to the metal. Hold that corner of metal & vinyl and make sure the peeled off backing is rolling off the other side. Start slowly, methodically, pushing at the ‘join’ where the rest of the sheet is meeting the metal. It sort of slowly peels/ forces itself off and unrolls onto the metal, hard to describe!

I used my hand, a soft cloth or a soft edged squeegee so as not to scratch the vinyl for this.

5 – Inspect. Even if you haven’t used the wet application method you can sometimes unstick and reposition the vinyl to get rid of any air bubbles, but squeegee as many out as you can. Or make a TINY prick in the middle of each bubble to release the air, and flatten.

6- Flip over to the back of your metal plate, you should have a nice edge border of sticky silvery vinyl showing. Cut 45 degree angles at any bends and then lots of strips around curves/ bends.

7 – Pulling towards the centre of the metal, pull the longer flatter flaps along straight edges tight to the edge and stick down. Repeat with all the wee corner strips.

8 – If, unlike me, you need both sides covered, cut another sheet of vinyl exactly to the size of the metal (or lightly smaller – the central strip that holds the metal plates in place will catch and push any open edges), and stick down on the ‘back’ using the same method. Glossy plain vinyl really shows any imperfections under it, so you may want to trip your stuck -over edges neatly if you do that.

The lid is harder so definitely wet application method! (I do all my car decals this way). Measure and cut a sheet of vinyl a good few inches larger than needed.

Spray the inside of the lid, peel and stick 1 corner or the top edge (leaving overlap where you started), and squeegee diagonally.

When happy with positioning, get rid of any bubbles (none this time, yay).

Push the vinyl as close into all edges and corner as you can, it will ‘frill’.

Using a sharp craft knife, make little cut in the frill down to the edge / corner of the inner lid. Sort of like the hospital corners on the boards wrapping. This will let the ‘frill’ relax so you can flatten it to the sides of the lid.

Using a sharp knife trim the flattened ‘frill’ neatly or even just cur around the inner lid board. I left a bit of an edge as theres glue etc caught in the seams I could see from earlier incarnations of my craft n go kit.

That is as far as I have got so far. I’m waiting on new clamshell paint holder inserts (I sold my old ones a few years back), and a flexible LED light strip and El-wire this time, as they are all much cheaper now.

My brushes are currently usually stuck onto the lid with magnets on their handles but I want to change that. I’ve tried brush stands, brush bars, foam , etc and not been completely happy with anything over the years. So I’m trialling the sticky pad brush holders from Real Techniques. 

They have those ‘magic’ sticky pads, allegedly clinging to any smooth clean surface once left to cure for 24 hours. The long grey multi brush holder has held on full of brushes so far (will have to see if it can stand them being pulled on and off at a gig), but the hideous pink pocket one fell off with 2 brushes in it after a few hours so I’ll be complaining about that…

Revamping my face paint kit again…(Craft n Go) Part 1

Like all painters I have been forever trying new ways of carrying and presenting my kit.

In the beginning (wayyy back in 2000), all that was available was the blue plastic trays for Snazaroo. Nice idea but the blue looked very kiddy, they snapped really easy and I soon had them all taped around the edges, and the lids didn’t last long either. Plus I didn’t stick with Snazaroo paints for long, and other paint brands didn’t fit in unless I gouged them out of their pots.

I went back to my art school roots and had a small black artists toolbox with everything, then when I was doing a lot of big mad music festivals,  a larger upright toolbox with wheels. I rightly thought that would be tougher than the arty ones, it wheeled OK across endless fields and didn’t take up too much floor-room in a tent.

For bookings in New Zealand I cut right down to a small packable kit.

Living on a catamaran in Hong Kong, relying on boats, buses and taxis and no lifts in buildings,  I learnt I had to be minimal. I reduced down to 2 laptop sized inserts in a ‘clamshell’ lidded palette box, which was carried in a rucksack or shopping trolley with all the other bits. I had a good look at the pull-about makeup kits a lot of makeup artists there had. A waste of time, too small, the larger were too heavy, too complicated, not sturdy enough and really only any use in nice flat makeup studios.

When we emigrated back to the UK, I switched to a bigger handled bigger wheeled much larger ‘trunk’ toolbox . This was fab for trundling through the Norfolk woodland theme park to my daily painty gig for several years at Bewilderwood, as originally they only gave me a platform with a dodgy parasol to work under. So everything had to be sturdy and very waterproof for the British weather all year – I could stuff everything back in it fairly fast if it rained. (Not always fast enough). I still have this, it stores all my acrylic craft paints & brushes I use  when I am doing murals and urban art statues. It is fab as I can stand or sit on it to reach higher.

Bewilderwood then built my a stunning painting treehouse, in keeping with the rest of the park, but with a tiny shelf to paint on – I was in the middle with 2 stencillers and a till on either side, so I really had to downsize again.

Eventually I upgraded to a ‘DJ Hero’ Case which was a style I liked better as you could more or less open the lid and be ready to paint. However the legs were rubbish, and had to be carried separately, it was heavy and awkward to carry, and quite flimsy as it was just cardboard walls (not waterproof either).

I then converted a golf flight case which was even heavier but I also magnetised that so paints etc with magnets taped on would stick and not slide about. I liked that idea but never did have the tools to attach a salvaged suitcase extending handle, or wheels.

Eventually I bit the bullet and imported a Craft N Go, the smaller paint station specially designed with painters in mind. It’s not perfect – the handle even with the extension is a bit short for me (I’m fairly tall) and I would prefer a stiff extending handle. The attached legs are still a little wibbly if bumped, but its pretty darn good. Tough shell (I went for black as most corporate gigs ask for all black setups), OK wheels (not much ground clearance for gravel/ field gigs, but I tend to stick it all in a big trolley anyway), magnetised base and inner lid.

I’v had it for several years now and its seen a lot of use at my own bookings and demos as well as being the test kit for the Paintopia shop at events. The inner lid metal was stained – I’ve tried various cleaners and even  isopropyl but no joy. Its had mirror acrylic etc magnetized on at various points but now I wanted a change. The black gloss sticky backed vinyl on the base boards was also stained and a bit nicked and dinged.

I’m doing much less work abroad now the kids are older, so I also wanted to go back to single colours in the palette inserts (minus the lidded palette box) rather than repotted doubled up paints in a tray, its easier to keep track of the dates and batch numbers of the paints for insurance purposes when they are in their original pots anyway . (But do take a photo of the base and note the date you started the paint as some labels do get worn away!).

So – Part 2 is re-doing my CraftnGo…

Glastonbury Body Art Festival Jan 2019, Maya Ix Chel Jocelyn Paint

This was the 2nd occasion artist Mel Broom and maker Stephen Duross had hosted this event. The inaugural day last January 2018 was a huge success, with a massive queue of public waiting for hours to get in to see the artwork as it happened and then returning for the catwalk. This year the larger Glastonbury town hall was booked, and the theme was Gods & Goddesses.

As it was just after a busy Halloween/ Christmas season, I’d really not had much time to think about what to paint. I knew I wanted to do something from the Mayan Pantheon, as I’d been fascinated by the art and ruins I saw when we lived in Belize. I was lucky as when I was a kid, my stepmother chaired the Mundo Maya coalition of governments/ tourist boards who went to visit lots of Maya ruins around Central America, deciding which to open up to tourists in what is now the very well known Mayan routes. I ended up doing my BSc thesis on Mayan medicinal plants, etc!

Then we heard the horrific news that Jocelyn Casdorph, a well known face and body artist, who worked and taught internationally, had been killed by her husband over Christmas. Her designs (and own cheerful face) inspired many and I wanted to paint a tribute to her. I’d been thinking of maybe doing IxChel, the moon goddess. As well as being patron of weaving and the moon, she looked after women and had escaped a jealous angry husband herself. So, I had a story for my paint, and a vague idea, but I designed as I painted on the day!

I used my Cricut Maker to cut feathers I had drawn out of various foils and papers, to represent Quetzal bird feathers. You can’t get them – the stunning iridescent birds are threatened so now protected in Guatemala, etc – and although similar to peacocks I decided to stick to paper.

I also designed some jaguar print stencils as that is another animal product often worn by Mayans. (As it was I forgot the largest ones I meant to use on the day so the smaller ones had to do. I also forgot half of the paper clay jaguar teeth which were still drying). Paintopia sell my #cutbycat jaguar print stencil.

It was a cold, frosty morning when I collected Izabela and drove down to Glastonbury. She’d a terrible cough so was really amazing to insist on modelling for me. We checked in with Mel, Stephen and Debs, and set up in the space we had been allocated under the lovely chandeliers. I’d bought both of the Paintopia TML Makeup Lights I look after with me, so set them up to light as many artists as I could at our end of one row. And got painting!

There were lots of breaks for teas and lovely food (thanks everyone, luxury!) and the world’s largest baked potato. The public were allowed in from lunchtime, so we then painted whilst also being filmed, photographed and chatted to. I think Izabela’s most controversial question from a child was why she was drinking coffee! As always even the kids were fascinated, it is art and nobody is naked.

Error
This video doesn’t exist

Artists and models were all levels of experience, age and shape, painting together so there was a huge range of styles. You had ‘old hands’ such as myself, Liz Bylett, Jenny Marquis, Erica Wafford etc, models who have had dozens of paints a year like Izabela, and newer makeup artists/ face painters too. Then there was the famous Linda Ravenscroft who tried her 1st body painting last year at this event and created a fab Morrigan.

Jenny’s model had stepped in last minute and did amazingly on her first ever bodypaint, as did the recipient of the days’ takings who ran the Childrens World Charity.

And Sam the local Blacksmith rocked the catwalk as a cheerfully aggressive Thor! there were some fab collaborations as well, with famous armour maker Terry English lending some of his metal work to help decorate models who had no artists for whatever reason. Somehow Mel & Debs painted them and more!


I always put up a blurb about my paint for those too shy to ask, its in jade green below.

Goddess Ix Chel (rhymes with sea -shell)

All props made from paper by Cat

Ix Chel is the Maya Goddess of the Moon, Water, Rainbows, Weaving, and Childbirth.

I painted a moon over a Mayan temple (memories of visiting family friends at various ruins around MesoAmerica, and moonrises over the pyramids in Guatemala with me now-husband). Her dark blue skin was also meant to represent the night sky and constellations were added as random splatters or jaguar skin shaped patterns.

She is sometimes shown as a beautiful girl with sparkling skin sat in a crescent moon with her rabbit, brushing her shimmering hair.

I reused the amazing dread extensions I made years ago, that have been added to so many of my bodypaints and own outfits. Dark multicoloured wools, peacock feathers, shining silky ribbons…

In one tale, her amazing woven cloth attracted her love, the sun-god. Her grandfather didn’t approve of him, and accidentally killed her with lightning, but dragonflies surrounded and sang to her body for months, until she came back to life and married her sun god.

I re-used the dragonfly wings made for the Prosthetics show bodypaint in 2017 on my Cricut. This had involved scanning in a real dead dragonfly I had from when I ran Carlton Marshes Nature Reserve Education Centre, then painstakingly cleaning up he image online. I then cut it out in various sizes from all sorts of paper, card and acetate which I sprayed gold.

Sadly he was a jealous, abusive husband, and Ix Chel transformed into an invisible jaguar to escape him and hide whenever he looked for her.

I added blue jaguar spots over strips of yellow, like the Mayan costumes shown in some carvings. Also the paper clay fangs were added as jewellery.

She continued her work, helping women, weaving the life cycle, and keeping the souls of the dead.

I drew the mayan feathered serpent, which reminds me of the world serpent legend, surrounding a skull design that poor Jocelyn was known for.

This paint contains a skull design inspired by the face & body paint artist Jocelyn Casdorph, who could not escape her husband on Christmas Eve and lost her life. Her art brought colour and joy to many, and inspired other painters. I hope her story also inspires anyone seeing signs of, or trapped in domestic abuse, to reach out.

The hall filled up for the catwalk, standing room only! I ended up jumping in to help guide/ time models, which was fun.

Its a long day for the models and as Iz had to get to a casting in Manchester the next day, we didn’t stay long after the catwalk. Models were dancing on platforms and posing for photos so we had some quick shots then packed up and de-accessorised Izabela. I handed out the Cameleon soap samples Jennie had sent from the Paintopia Shop (it cleans skin as well as brushes) and we trundled my gear back to the car.

Huge thanks to all the organisers and everyone who came, a lovely creative event and a decent amount was raised for Children’s World!


PRIDE London eco glitter face & body art

This was a lovely booking from @beyondrepair dance company. Their client had booked the roof terrace and 2nd floor of Jamie’s Italian in London Piccadilly for their own pride/ football party above the crowds.

It is actually now faster AND easier for me to get into central London from Bath Spa (my nearest train station then) than it was when I lived ‘in’ London!

I knew Pride In London and other events on that day would mean public transport would be awful, especially with my full kit box and tall makeup chair, so I took along my trusty wheeled trolley wagon.

As expected my nice taxi driver had to drop my about half way to Piccadilly, and leave me amongst the millionaires clothes shopping in New Bond Street (its the world’s most expensive shopping street, FYI) to tow my kit to the restaurant. As I was in full homemade rainbow outfit (I’ll do a blog on that) I didn’t fit in well…

All was going well until I realised I still had to cross Regent Street… which meant crossing the parade! It took about 30 minutes to get to the front of the crowd at one of the designated crossing points, and a bit longer until a gap in the parade allowed myself and some late wedding guests to dash over.

I was set up in a lovely corner looking down 1 street to the Pride crowds, and the other street to crowds watching the important football match on giant screens.

The clients were fab, sadly though they offered me some of the lovely food they were all grazing on I was too busy from start to finish to stop and eat! Some had already been DIY face painting with a rainbow stripe stick.

These designs were all freehand or using the #cutbycat stencils available from my own shop and PaintopiaBodyArtSupplies

I finished my shift and started heading back to the station; as before no taxis and still some crowds and the tail end of the Pride parade to negotiate – all very colourful! I got some Churros as my treat whilst waiting for the train home.

Anti-horn Unicorn Bodypaint for The Prosthetics Event

I’d designed a head/ neck paint on the marvellous Angela Youngs when she offered to model for me at the UK Face Painting Convention where I was demonstrating products for the Paintopia Shop, in Oct.


Angela was amazing as always, letting me stick a unicorn horn I’d made onto her rather funky feathery clip-in mohican, then going out in full punk anti-corn mood to harass the public, guests and even cars! The response was so much fun I though I’d have a go at a full body one for my next demo.


Paintopia Jenn kindly asked me to demo for her at the extremely busy Prosthetics Event, which is always hosted by the guru that is Neil Gorton. Angela was our other demo artist, painting her own model this time, and I was decorating Rachel Shar Marston for the 1st time – I’d seen her modelling at the UK FP con and nabbed her!

I love researching each bodypaint and this one was inspired by horse armour worn on medieval battle horses, with the non-rainbow unicorn twist.

One thing I had been thinking on was how to get different pale ombre effect shapes on top of dark tones, so I tried adding sticky star vinyl shapes I’d had my Cricut cut sheets of on top of each of 4 layers of darkening paints on Rachael, in different places on each layer.

Our work experience makeup student, Steve, (he was brilliant, had his first try at body painting on Rachaels legs too and is hopefully now addicted) had the fiddly job of finding and peeling off all these stars after I’d added the black final layer, to reveal different shades under each.

It worked, I’ll use that method again. Paints used were Paradise white, Superstar Blue and Snow petrol, Cameleon Teal, Inkheart and Gothic black from the Paintopia Shop.

I wanted to try some different techniques, so has been talking to Cricut Uk re their new Cricut Maker machines which can cut my custom designs in much thicker materials than my current Cricut Air (which is 3 versions older). The plan was to do thick foam armour, cut on a Maker. Amazingly, they lent me a Cricut Maker to try all my ideas on! Typically I spent so long fiddling (making my mock-ups, so I could scan them to be cut in the foam etc) that I when I hit a fault with the special tool I had I didn’t have time to get it sorted by their helpful team in the USA.  Not a problem: I switched back to thinner material and ended up with a much prettier less tough and scary ‘armour’.

I’ve a fab giant foam horse head ‘hat’ I made on an EVA foam course with Alex Hansen, and wanted to do a variation on that. Preferable one I could easily recreate by scanning into my Cricut. I sketched and made mini versions, then scanned in my design, to make it cut out and then be tweaked again. Eventually I had a mini version of a 3D horse head which I planned to make in thick foam.

I drew a curly baroque engraving inspired doodle, scanned it in and then added shapes and patterns in Cricut Design Space until I ended up with a unicorn horned, spiky, shape. This I cut in various sizes and formations (sticking it to itself, elongating it, etc) from Hobbycraft Glitter card, metallic green textured card, Cricut faux leather, etc. I also cut and mirrored it to make ‘spikes’.

Pro photos by Ben Bentley

These shapes were layered into Rachels hair and glued onto her body with cosmetic adhesive (I sell the fine tipped cosmetic glitter tattoo application kits). I also had the Cricut cut thin foam ‘hooves’ for all four of her limbs which we glued to her wrists and shoes. We decided the smaller horse head looked better as a protective shoulder pauldron and glued it on there.


The wool and feather dreads on elastic I bough years ago on Ebay and have added to, they have been in so many bodypaints! One was tied into her hair under the horse-neck armour, the other was tied round her waist as a ‘tail’

Some one stroke leather strapping, gluing on and painting the dozens of assorted sized unicorn horns I’d made form paper clay (I sell them too), some fine glitter tattoo work  and Rachel was finished, all whilst answering questions from the curious crowds.

She swaggered off in appropriately punk-ish mood, swinging the original giant foam horse head, sneering with attitude which was perfect for her character, and posed for photos until the stage show.


Thanks to everyone involved, brilliant, busy event as always and I hope to see you all there next year!

Cricut Crafter Sugar Skull

My final official Cricut Uk Crafter of the Month project is based on a holiday that was very popular over the border from Belize where I used to live – the Day of the Dead celebrations. They seemed very joyful with families cleaning and decorating their ancestral graves and alters to welcome back their ghosts. Papal picado (colourful intricately cut paper flags / banners) decorate everything, and the too-pretty-to eat compressed sugar skull or coffin decorations are left out.

I was really glad when Day of the Dead style face paint started getting popular in the UK. I get fed up of being asked for blood and gore all the time, especially at Halloween, and the Sugar Skull genre gives so many creative possibilities as well as a kinder, happier, more colourful vibe. Now its all anyone wants in October (and many other months too).

Looking at the lovely materials Cricut UK sent me to try, I decided that the red and orange pearl papers, glitter sparkle card, black cardstock and some Hobbycraft white glitter card needed to be used.

2018-06-12 12.15.51

I set up the Cricut Design Space (CDS) using the same flower shapes I’d made for my Once Upon A Time demo, and cut them in different sizes and materials.

Again in CDS, using the simple shapes, I built an upright headdress shape in several layers,  and added flowers and sugar skull shapes to be cut out of it. I hoped this would give a stiffened lace mantilla effect.

I curled and then glued the flowers together to look like marigolds and other blossoms.

Rhyana was able to come over early one Saturday (squeezing this in before I had a 10 hour UV paint booking in an immersive rave!) and I started painting in the giant eye sockets and shading her to look more hollowed out.

Using a lacy stencil I’d cut, I added colour to make it seem as if Rhyana had a lacy carved or decorated surface to her skull.

Then we pinned in the various Cricut accessories and voila…

proj40_img00000659.jpgproj40_img00000743.jpg

I hope this might help some of you with Halloween costume inspiration.

So that’s the last of my 3 official Cricut Crafter of the Month projects, but I’ve several more I’ll be posting as I do use it all the time, not just for face & body paints.

Thanks for looking and thanks to Cricut UK and all the models involved with this – and Mark for the amazing coral body paint photos!

Cricut UK Crafter of the Month ‘Burgundy Butterfly’ Fairy face & body paint

As said in the Chasing Coral post, I’m delighted to have been asked by Cricut UK to demo what I do with their machine – I own a Cricut Explore Air and am saving for a Cricut Maker.

This time model Izabela fancied something pink and pretty. She likes insects and I thought a butterfly look might be more interesting for people who have kids or need fancy dress/ festival ideas etc.

I’d an idea of a flapper-festival-fairy sort of thing so that is what I created.

All photos taken by myself on my phone this time so do excuse the quality!

Short timelapse and final photos:

I found several free clipart jpegs of butterfly wings online, and I played around with them in Cricut Design Space (CDS). I strengthened veins and added cut out shapes as well as joining up any ‘loose’ ends.

Cricut butterfly cdsCricut butterfly chain

I arranged my chosen wing on the CDS matt as single wings (mirroring it so I could do symmetrical headgear), as pairs like a real butterfly, and welded into strips like butterfly lace.

2018-06-10 14.52.26

I positioned as many as possible into the size & shape of the material I wanted to cut them from and attached them before cutting with my Cricut Explore Air in assorted sizes and materials.

Cricut butterfly bodypaint vellum light.50

This time I added in cuts from the Vellum Cricut sent: I loved the translucent effect. I need to play with my settings a little as it didn’t always weed out as neatly as I liked, but it did take the intricate design fairly well, even the tiny wings.

Cricut butterfly bodypaint vellum dark.53

My new fave material is the Cricut sparkle paper which is like a heavy glitter cardstock. The glitter card I usually use (the A4 glitter card packs from Hobbycraft) has a granular finish, but this has a thick smooth glossy top layer over the glitter. It makes it seem very strong and is another great texture, which took the wing cuts amazingly well.

cricut-butterfly-bodypaint-glitter-card-stock-22.jpgCricut butterfly bodypaint sparkle card.55

Cricut Sparkle card in dark pink &  Hobbycraft white glitter card

The Cricut corrugated pastel cardboard did look fab with its striped pattern, but again I will fiddle with my settings a bit, as I found that when weeding (Ok I wasn’t being incredibly careful as I had a deadline), tiny uncut areas would peel off the back colour revealing the white underneath which was a bit annoying. I am sure you can’t see it in the photos, but it meant those wings were not truly double-sided colour, which would have been better.

Cricut butterfly bodypaint Opal.56The Cricut opal sticky back vinyl as well – ooooh I love it! Pinky-blue pearly almost neon flashes in some lights, stunning.  It took even the tiniest wing details too, but urgh weeding that small is a faff. Worth it though I think. As it was stuck onto other layers and over paint, its fine on the skin but not something I would adhere directly as it is not a cosmetic product. So pretty! 

I repeated the single wing and butterfly chain patterns as stencils cut from mylar.

Proj39_img00000016Proj39_img00000057

After basing Izabela with Cameleon face paint reds blended through pinks to whites, I stencilled the butterfly chain along her upper chest using a darker burgundy.

Proj39_img00000118Proj39_img00000142

Then loading my sponge with a home-made ‘rainbow’ split cake in pinks and golds, I stencilled the large wing patterns onto her face and smaller butterflies all over her neck.

Proj39_img00000164Proj39_img00000192

Most of my time was then spent pinning and gluing the Cricut cut-outs onto her. Any bits glued onto her skin I used cosmetic water based adhesive, which we remove with baby oil or rubbing alcohol when it has dried and we are finished with the look.

Proj39_img00000222Proj39_img00000295

And there we have it; I love the layered wing headband/ bunches look and will be using the Cricut leathers etc to make myself a more permanent set for working at festivals, I think!

Cricut Butterfly bodypaint garden hug bpc

Cricut Butterfly Fairy side bpc

Cricut Butterfly Fairy look bpc

Cricut butterfly bodypaint look white bpc

Cricut butterfly bodypaint garden down bpc

Thanks to Izabela, the Cricut UK team, and my youngest, who was unexpectedly home and was really good. He sat like an angel for his 1st ever face paint after watching the whole shoot,  and begged to be a dinosaur…

Euans ist dino facepaint and Izabela butterfly.37Euans 1st facepaint, a dino.39

I’ve a 10 hour booking in an ‘immersive rave wonderland’ this weekend and I may wear the headwings in the hope I’ll fit in more with the youngsters I’m decorating!


Cricut Crafter of the Month/ Coral Bleaching Bodypaint

Over the last year I’ve been creating more intricate, mainly paper (it’s more eco-friendly & I can store it in smaller spaces!) accessories for my body paint models.

I can also now custom-cut my own stencils without risking hot-pen burns, as well as create the #cutbycat stencil range for Paintopia Jenn.

This is due to my Cricut Explore Air; a big investment but a big love of mine. I had been eyeing them up since they launched in America years back but only got one last summer. Well worth it!

(This Cricut-accessorised selection is all on Izabela – a fab local model who is often available for me)

I was amazed when Cricut UK started talking to me on social media and asked if I’d be their #CricutCrafteroftheMonth for June. Yes please!
They kindly sent some of their materials for me to create projects showing why I like the machine.

Please note; I don’t use nudes, in all my work on social media models wear knickers, with large breast covers as a minimum on females.

My first artwork for Cricut is based on a something I adore; the ocean.

Connel beach towards Mull; fishing in Belize; life on Hong Kong catamaran

I went to school in the highlands of Scotland with its pristine beaches, but spent holidays in Belize on the world’s 2nd longest barrier reef. Later I ran underwater nature trails in Dorset. We also lived on a catamaran in Hong Kong after sailing it there from Palau, so I’ve admired sea-life world-wide. I hope to take my kids to see reefs when they are older.
Recently I watched the Chasing Coral documentary on Netflix, and the BBC’s Blue Planet 2 series (well done my old uni mate Kathryn & co!). I no longer teach field studies (I’m an artist and now work part-time in a craft chain store too) but wanted to do something to raise interest in ocean issues. Plus I always loved the patterns and textures underwater and thought that would work well on a Cricut project – I adore layers that reveal more layers!
So, I tried to visualise coral bleaching. This is when corals get stressed due to warming seas and pollution, and expel their algae, turning white. Some starve without their algae providing food from photosynthesis, so rot and die. Just the ‘bones’ are left; all the colour goes from the corals, the bright fish and other creatures soon dying or leaving too. (There is hope and it can recover, but we need to help it now.)
To create this effect I scanned in corals I collected on Belize beaches as a kid, and uploaded photos and copyright-free images found online. I altered and thickened them in Cricut Design Space (CDS), so I had intricate but hopefully strong patterns to cut. Other shapes I made from scratch in CDS, welding together then slicing basic circles.

Cricut Coral DS seaweed coral 30 May 2018 21-59Coral cricut DS cutting screen 1 Jun 2018 15-35

I hate wasted material, so in CDS often attach many shapes together into the size of the material I will be cutting to maximise the amount I can fit on a sheet. Cuts this many, this large and so intricate meant I was on my Cricut several hours every evening for over a week, with a whole day spent on it the day before the shoot. I am saving to upgrade to a newer, faster Cricut Maker but even so my older Explore Air is fabulous.

CricutCoral Bodypaint dsitressed foam close 31 May 2018 09-24.57CricutCoral Bodypaint dsitressed foam 31 May 2018 09-24.52CricutCoral Bodypaint dsitressed foam weeding 31 May 2018 09-37.01

Weeding the distressed foam cuts.

Using the correct settings, mats and blades, I cut different corals in all the materials, in varying sizes. That is why I love Cricut Explore Air; once I have the shape I want, I can make multiple copies in any size for crafting, or convert them into stencils.

CricutCoral Bodypaint building hat 1 Jun 2018 15-59.01cricutcoral-bodypaint-building-hat-brain-1-jun-2018-18-52-06.jpg

I cut lots of each shape from Cricut UK’s pearl, sparkle, glitter and corrugated papers and cardstock in blues, greys, blacks and silvers. I especially liked the distressed foam for coral cutouts and the plush foam for the intricate brain coral pattern covering the top of my headpiece, they had perfect textures and took the patterns really well. 

Cricut Coral setting up in studio 2 Jun 2018 14-09.54

Izabela Kowalewska arranged the shoot at Mark Pickethalls‘ lovely photo studio; he got creative painting glass lenses for background effects whilst I prepped her. 
The following snaps are from my time-lapse, but give an idea of what went on.

Cricut coral bodypaint 2cricut-coral-bodypaint-3.jpg

I started with a simple blue body paint base, slightly patchy, to represent beams and streaks of light reaching down from the surface, and different water currents.  I pinned the wire frame I’d made and partially covered with coral shapes onto Iz’s hair, and started pinning and gluing on the other materials I’d cut.
On her headpiece and breast covers I used tacky craft glue or hair grips, but anything touching skin was attached with cosmetic adhesive.

Cricut coral bodypaint 4Cricut coral bodypaint 5

More shapes were added and then I started gluing them onto the large bikini insert triangles which were body-glued onto Izabela’s chest too.


Next I stencilled in some of the same patterns as I had cut to give more depth and detail.

Cricut coral bodypaint 7 stencilcricut-coral-bodypaint-stencil-10.jpg

As I wanted to focus on the cut coral patterns and textures this is probably the most minimal body paint I have ever done. Iz was ombre blues/ green – all cosmetic Cameleon bodypaints – with touches of black and white stencilled on too.

I loved the sheen of the midnight blue pearl paper, but it was a bit fragile for building props with of course, so was mainly glued on as a bottom texture layer over her paint.

This took me several hours; towards the end Mark set up his photo studio, and we switched off the time-lapse before I finished to move equipment around.

cricut-coral-bodypaint-17.jpg

Mark was inspired and had been painting glass panels for his lighting with Hobbycraft glass paints too, which created the amazing patterns and effects on the backgrounds in his photos.

Then Iz threw her graceful poses (with a serious face as this was not really a smiley look – see her next time for her lovely grins!) and together we created these end results which I LOVE.

I’m hoping you are inspired to try layering up Cricut makes into a headpiece, or try stencilling…

Too many pics I know, but I couldn’t choose a favourite!

Cricut Coral Blue side crop look bpc

Cricut Coral Blue had crop bpc

Cricut Coral Blue headtop0X0A4605 bpc

Huge thanks to everyone at Cricut UK, Mark and Izabela.